Are you struggling with wire rope assembly? Incorrect thimble installation can lead to dangerous failures. Learn the right way.
You properly install a wire rope thimble by seating it firmly within the eye splice. This protects the rope from abrasion and crushing. It also maintains the loop’s shape and strength.
Getting it right is crucial for safety and performance. Let me show you how a quick mistake can cost you a lot.
What is a Wire Rope Thimble, and Why Do You Need One?
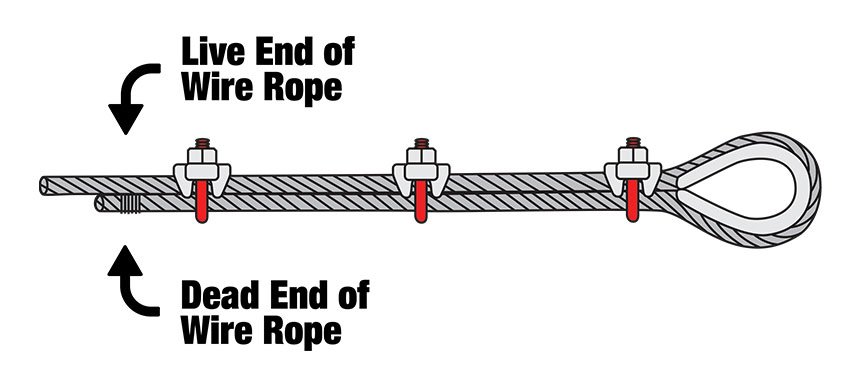
A wire rope thimble is a metal fitting. It is shaped like a teardrop. You place it inside the eye (loop) of a wire rope.
A wire rope thimble protects the eye of a wire rope. It prevents damage from direct contact with hooks or other fittings. It also prevents the rope from kinking or flattening.
Using a thimble extends your wire rope’s life. It keeps your operations safer.
Why Thimbles Are Essential for Wire Rope Lifespan
Thimbles reduce direct wear on the rope. They stop the rope from bending sharply. This protects individual strands from breaking. Without a thimble, the rope eye will quickly wear out. This reduces its breaking load. My factory, Aulone, always stresses the importance of strength. We build our ropes for high tensile strength and high breaking loads. A thimble helps maintain these qualities.
Types of Thimbles
Different thimbles fit different needs. Here are some common types:
| Thimble Type | Material | Application |
|---|---|---|
| Standard (Light) | Galvanized Steel | Light-duty applications |
| Heavy Duty | Carbon Steel | Cranes, heavy lifting |
| Stainless Steel | Stainless Steel | Marine, corrosive environments |
| European Standard | Galvanized Steel | EN12385-4 Compliant |
Each type offers specific benefits. For instance, my company offers galvanized wire rope. These work well with galvanized thimbles. This combination offers great corrosion resistance.
Impact on Safety
Properly installed thimbles are a key safety feature. They prevent the rope from failing at the eye. This is often the weakest point. A worn eye can snap under load. This creates a very dangerous situation. My team at Aulone knows this. We offer ropes compliant with EN12385-4. This standard ensures top safety.
What Are the Steps to Install a Wire Rope Thimble Correctly?
Installing a thimble involves several careful steps. This ensures a secure and strong eye. Each step matters for safety.
You install a wire rope thimble by first forming a loop around the thimble. Then, you secure this loop using proper splicing or swaging methods. This ensures the thimble is tightly held in place.
Precision in each step prevents future problems. It also maximizes the rope’s lifespan.
Step-by-Step Installation Guide
Here is a detailed guide to installing a wire rope thimble:
- Select the Right Thimble: Make sure the thimble size matches your wire rope diameter. An ill-fitting thimble will not provide proper protection. My factory ensures all our wire rope products meet high-quality standards. This includes ensuring correct sizing.
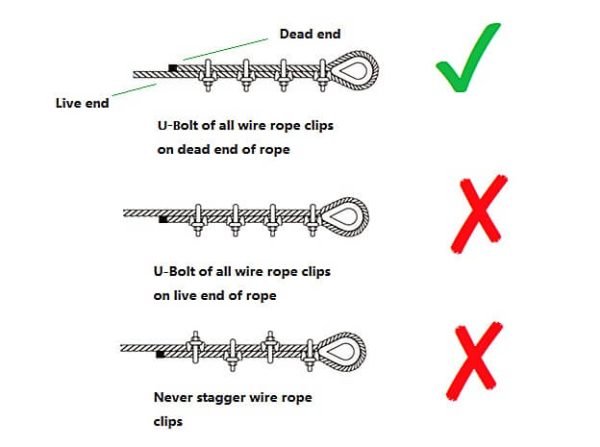
- Form the Eye: Bend the wire rope into a loop. Place the thimble inside this loop. The thimble should sit snugly in the curve.
- Secure the Eye: You can secure the eye with either a splice or a swage.
- For Splicing: Weave the loose end of the rope back into the main body. This creates a strong, permanent loop. This method is often used for larger ropes. It requires skill.
- For Swaging: Use a metal sleeve (ferrule). Place it over the two rope ends where they meet. Then, use a swaging tool to crimp the sleeve securely. This creates a strong mechanical joint. This is a common method for faster assembly.
- Inspect the Assembly: After installation, check everything. Make sure the thimble is firmly seated. Check for any loose strands or kinks. The thimble should not move within the eye.
Tools You Will Need
Proper tools make your job easier. They also ensure a correct installation.
| Tool Type | Purpose |
|---|---|
| Measuring Tape | For precise rope length measurements |
| Wire Cutters | To cut the wire rope cleanly |
| Swaging Tool | For crimping ferrules (if swaging) |
| Splicing Fid/Needle | For manual splicing (if splicing) |
| Marker | To mark rope for cutting or bending points |
My company offers specialized assemblies. We understand the importance of having the right tools for the job.
Common Installation Mistakes to Avoid
Many issues come from simple errors. Avoid these common mistakes:
- Using the Wrong Size Thimble: Too small, and it won’t protect. Too big, and it will shift.
- Insufficient Crimping (for Swaging): The sleeve must be crimped enough. If not, the rope can slip.
- Poor Splicing: Bad splices weaken the rope. They can unravel under load.
- Not Inspecting: Always double-check your work.
I always tell my customers from Canada and Australia: “Accuracy matters in every step.” This principle applies to thimble installation.
How Can You Ensure the Longevity of Your Wire Rope and Thimble Assembly?
After installation, care and maintenance are vital. This extends the life of your entire assembly. Neglect can lead to early failure.
You ensure longevity by regularly inspecting the assembly for wear and corrosion. Proper storage and avoiding overloading also protect your wire rope and thimble.
Preventive measures save you money and prevent accidents. This is something I always highlight to our clients in Singapore and Indonesia.
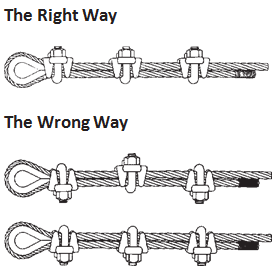
Best Practices for Maintenance
Regular inspections are your first line of defense. Look for signs of damage.
- Visual Inspection: Check for broken wires, kinks, or crushing near the thimble. Look for rust or corrosion.
- Thimble Condition: The thimble itself should not be bent or worn. If it is, replace it.
- Lubrication: Keep the wire rope lubricated. This reduces internal friction and prevents corrosion. We offer plastic-impregnated ropes at Aulone, which have excellent self-lubrication.
- Documentation: Keep records of inspections and maintenance. This helps track wear patterns.
Signs of Wear and When to Replace
Knowing when to replace an assembly is critical. Look for these signs:
| Sign of Wear | Action Required |
|---|---|
| Broken Wires (severe) | Replace |
| Kinking, Crushing, Flattening | Inspect/Replace |
| Severe Corrosion | Replace |
| Distorted Thimble | Replace |
| Reduced Diameter | Replace |
My factory provides high-quality ropes. But even the best ropes need replacement over time. My products comply with standards like BV & CE, RMRS, DNV, and ABS. These certifications mean our ropes are built to last. Still, user care is essential.
Proper Storage Techniques
Storing wire rope correctly prevents damage.
- Clean and Dry: Store ropes in a clean, dry area. Avoid direct sunlight.
- Off the Ground: Keep ropes on racks or pallets. This prevents moisture damage.
- Proper Coiling: Coil ropes without kinks.
- Protect from Chemicals: Store away from corrosive chemicals.
These steps are simple. But they make a big difference. I always advise my customers, like those in Saudi Arabia and the UAE, to take these steps seriously.
Conclusion
Installing a wire rope thimble correctly is key for safety and longevity. Follow proper steps. Maintain your assembly. This ensures long-term performance.


